Are you concerned about your beautiful picture having distracting backgrounds? Stop worrying, because I have the solution to this problem. Whether it’s a messy room behind your cute puppy or a crowded street scene behind your friend, a distracting background can ruin an otherwise great photo. In this article, I will show multiple techniques on how to blur the background in lightroom on both mobile and PC.
5 Methods to Blur the Background in Lightroom
There are 5 methods to blur the background in Lightroom. Two of them latest which are available in latest versions of adobe lightroom after mid of 2023. These methods use advanced AI technology to save time and simplify the process of blurring backgrounds This making it faster and easier to achieve perfect results.
The remaining three methods are traditional. These methods require more manual effort and time but allow for greater control and customization of the blur effect.
Blur the Background in Lightroom Mobile App (Android and iOS)
Using Lightroom to blur the background of your photos is a powerful technique. Fortunately, the steps are the same whether you are using an Android or iOS device. You can download the latest version of Lightroom Android app or buy a paid subscription plan to use lightroom on iOS.
Following these methods to blur the background in Lightroom Android or iOS app.
Import or Capture the Image in Mobile
For all the below methods, first you have to import or capture the image in mobile by following method:
- Open the Lightroom App on your mobile.
- Tap the “+” button to import a photo from your gallery, or use the camera icon to capture a new image.
1. Steps to Blur the background in Lightroom using the Lens Blur Method
- Go to the Lens Blur panel and click “Apply.”
- Set the blur amount and choose the bokeh style you want.
- Adjust the focal range slider to fine-tune the blur distance.
- Click the “Visualize Depth” button to see how the AI reads your image.
- Use the Brush tool to fine-tune your blurred areas if necessary.
2. Steps to Blur the Background using AI Mask
- Open your image and go to the Develop page.
- Click the Masking icon (Shift + W).
- Option 1: Click “Select Subject” to create an AI mask of your subject.
- If the selection includes unwanted areas, click “Subtract” and use the Brush tool to remove those parts.
- Invert the mask by right-clicking on Mask 1 and selecting “Invert” to blur the background.
- Option 2: Click “Background” to automatically select the background using AI.
- Adjust the Sharpness slider to the left to blur the background in lightroom app.
3. Steps using the Brush Tool
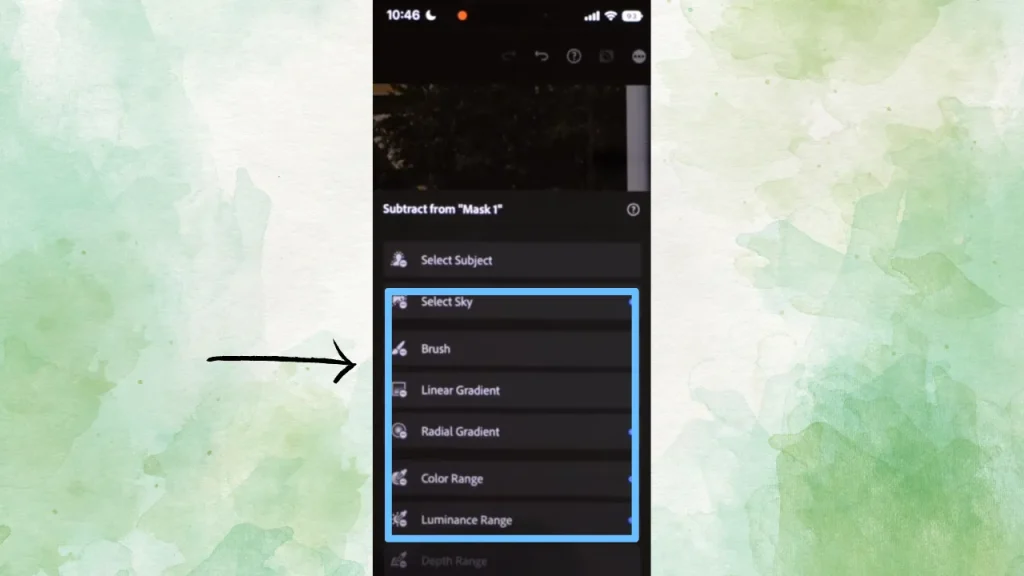
- Tap on the masking tool icon and select the Brush tool.
- Adjust the brush size, feather, and flow.
- Paint over the background area you want to blur, avoiding the subject.
- If you accidentally paint over the subject, use the Erase option to correct it.
- Move the clarity slider to the left to blur the background in lightroom. You can also adjust other settings like exposure and sharpness.
4. Steps for Radial Gradient
- Tap on the masking tool icon and select the Radial Gradient tool.
- Click and drag to create an oval or circular gradient around your subject.
- Adjust the size and position to cover the background area.
- Move the clarity slider to the left to blur the background. Adjust other settings as needed.
5. Steps for Linear Gradient Method
- Tap on the masking tool icon and select the Linear Gradient tool.
- Click and drag to apply the gradient over the background.
- Adjust the direction and length of the gradient to cover the desired area.
- Move the clarity slider to the left to blur the background. Adjust other settings as needed.
Save and Share Your Image
- Android and iOS: After you’re satisfied with the blur effect, click on the checkmark to apply the changes.
- Click the save icon to export your edited photo to your gallery.
- You can also share the image directly from Lightroom to your social media or messaging apps.
By following these steps, you can easily blur the background of your photos on both Android and iOS devices using Lightroom, making your subjects stand out beautifully.
Blur the Background in Lightroom on PC and Mac
Using Lightroom to blur the background of your photos on a PC or Mac involves similar steps, but there are some minor differences in the interface and keyboard shortcuts between the two platforms. Here are the detailed steps for both:
Import or Capture the Image on PC or Mac
Before applying any of the methods below, you need to import your image into Lightroom on your PC or Mac:
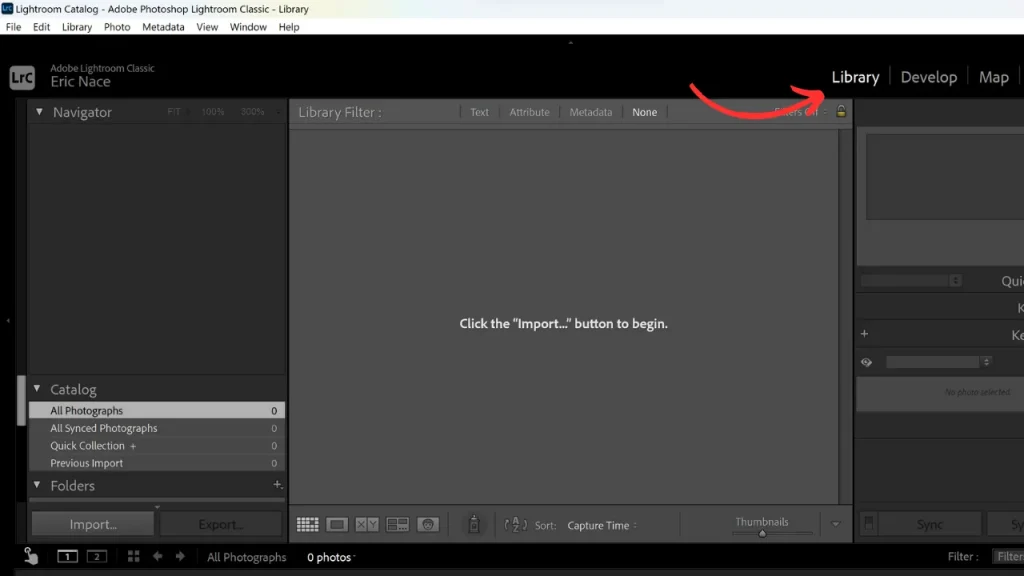
- Open Lightroom on your PC or Mac.
- Navigate to the “Library” module by clicking the Library button at the top right corner.
- Click on “Import” to upload or select the image from your pc folder which you want to edit, or you can simply drag the photo in lightroom.
1. Lens Blur Method
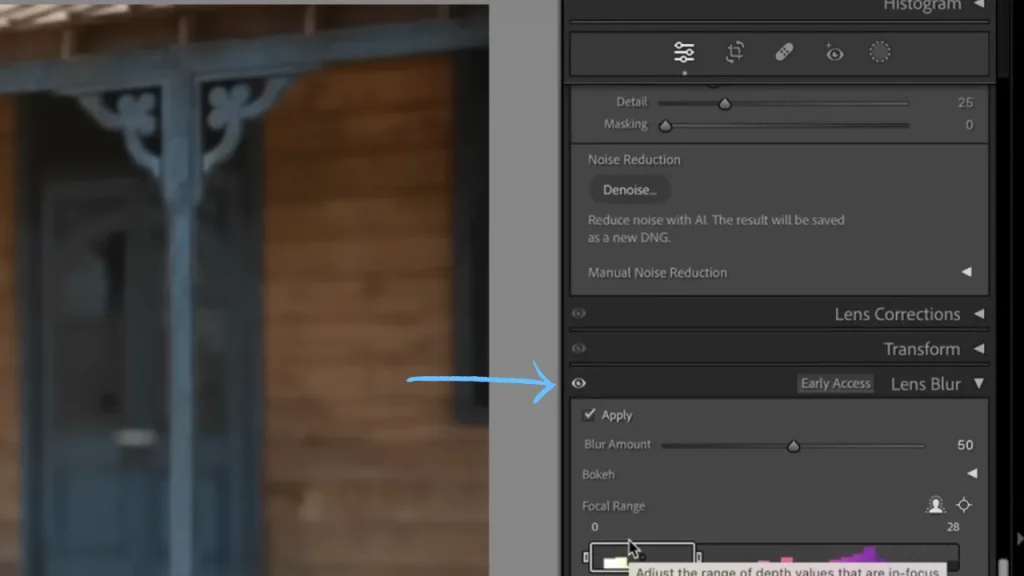
- Go to the Lens Blur panel and click “Apply.”
- Adjust the blur amount and select the bokeh style you prefer.
- Use the focal range slider to fine-tune the blur distance.
- Click the “Visualize Depth” button to see how the AI interprets your image.
- Use the Brush tool for any necessary fine-tuning of the blurred areas.
2. AI Masking Method
- Open your image and switch to the Develop module.
- Click the Masking icon (Shift + W).
- Option 1: Click “Select Subject” to create an AI mask of your subject.
- If the selection includes unwanted areas, click “Subtract” and use the Brush tool to remove those parts.
- Invert the mask by right-clicking on Mask 1 and selecting “Invert” to blur the background.
- Option 2: Click “Background” to automatically select the background using AI.
- Option 1: Click “Select Subject” to create an AI mask of your subject.
- Adjust the Sharpness slider to the left to apply the blur.
3. Steps using the Brush Tool
- Click on the masking tool icon and select the Brush tool.
- Adjust the brush size, feather, and flow.
- Paint over the background area you wish to blur, avoiding the subject.
- If you accidentally paint over the subject, use the Erase option to correct it.
- Move the clarity slider to the left to blur the background. Additional settings like exposure and sharpness can also be adjusted.
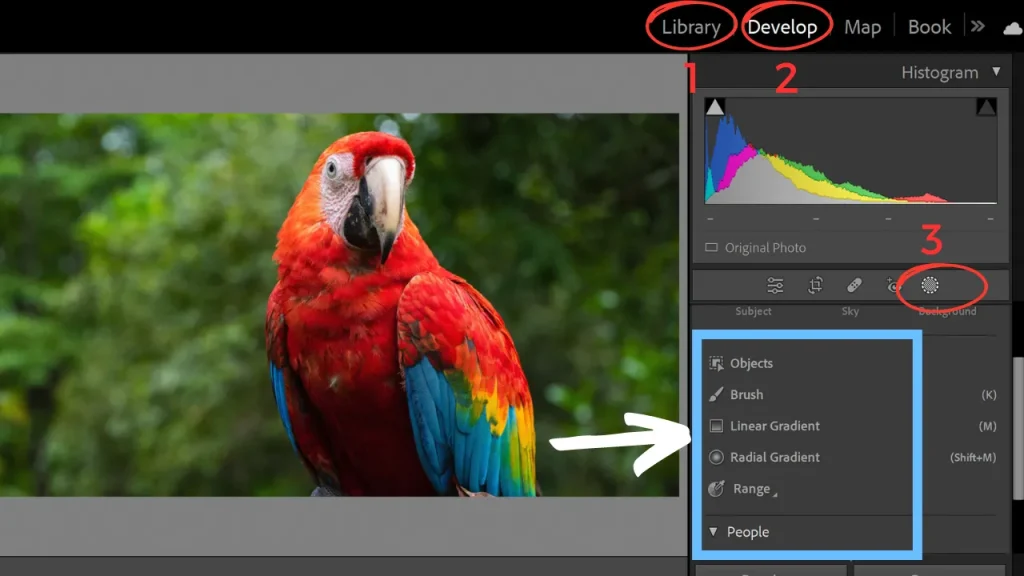
4. Steps for Radial Gradient to blur the background in lightroom
- Click on the masking tool icon and select the Radial Gradient tool.
- Click and drag to create an oval or circular gradient around your subject.
- Adjust the size and position to cover the background area.
- Move the clarity slider to the left to blur the background. Make further adjustments as needed.
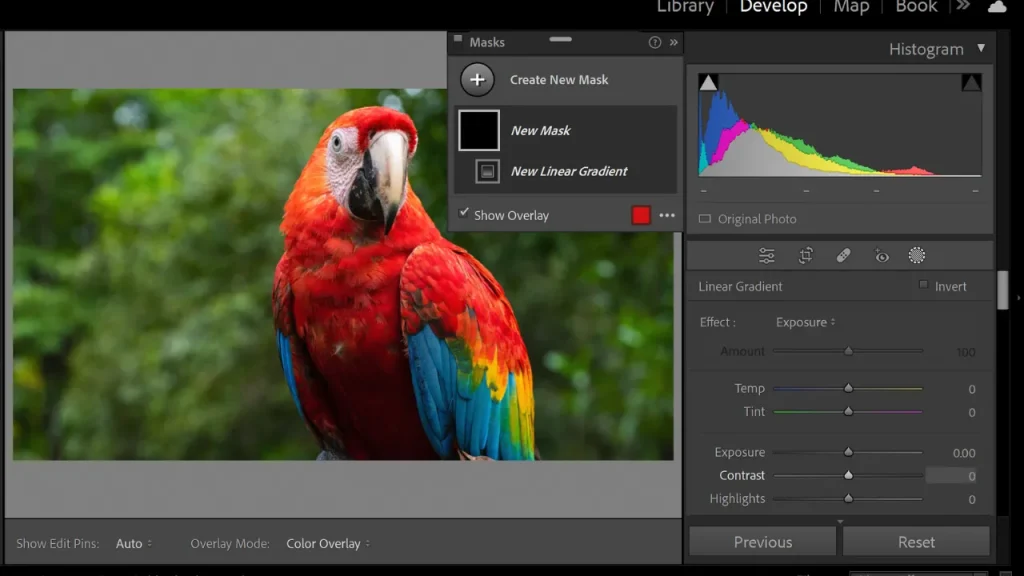
5. Steps for Linear Gradient Method
- Click on the masking tool icon and select the Linear Gradient tool.
- Click and drag to apply the gradient over the background.
- Adjust the direction and length of the gradient to cover the desired area.
- Move the clarity slider to the left to blur the background in lightroom. Make additional adjustments as needed.
Save and Share Your Image
- PC and Mac: Once you’re satisfied with the blur effect, click the “Done” button.
- To save your edited photo, go to “File” > “Export” and choose your desired settings.
- Save the image to your preferred location on your device.
By following these steps, you can effectively blur the background of your photos using Lightroom on both PC and Mac, making your subjects stand out and giving your images a professional touch.
Pros and Cons of Each Method
Blurring the background in Lightroom can be done using several methods, each with its own advantages and disadvantages. Here’s a detailed look at the pros and cons of each method for both mobile (Android and iOS) and desktop (PC and Mac) versions.
1. Using Lens Blur
Pros:
- Quick and Efficient: Uses AI to quickly blur the background in lightroom.
- Customizable: Allows for adjustment of blur amount and bokeh style.
- Depth Visualization: The “Visualize Depth” feature helps in accurately applying blur.
Cons:
- Requires Latest Version: Available only in the latest versions of Lightroom.
- Limited Control: May not offer as much manual control as other methods.
- Subscription Required: Often requires a premium subscription for access.
2. Using AI Mask
Pros:
- Accurate Selection: AI accurately selects the subject and background.
- Time-Saving: Faster than manual methods.
- High Precision: Minimizes errors in masking complex subjects.
Cons:
- Software Dependent: Effectiveness depends on the quality of the AI algorithms.
- Manual Adjustment Needed: Sometimes requires additional manual adjustments for perfection.
- Subscription Required: Typically requires a premium subscription.
3. Using the Brush Tool
Pros:
- High Control: Offers precise control over the area being blurred.
- Flexible: Can be used for complex shapes and detailed areas.
- Available in All Versions: Does not require the latest software updates.
Cons:
- Time-Consuming: Requires more time and effort compared to AI methods.
- Skill Required: Needs a steady hand and practice to use effectively.
- Manual Work: Can be tedious for large areas.
4. Using the Radial Gradient
Pros:
- Simple and Effective: Easy to use for creating oval or circular blur effects.
- Quick Adjustments: Allows for fast adjustments of size and position.
- Ideal for Portraits: Works well with subjects centered in the frame.
Cons:
- Shape Limitation: Limited to circular or oval shapes, not suitable for all subjects.
- Less Precise: May not be as precise for irregular shapes.
- Manual Adjustment: Requires manual fine-tuning for best results.
5. Using the Linear Gradient
Pros:
- Natural Look: Creates a natural depth-of-field effect.
- Easy to Use: Simple drag-and-drop interface.
- Great for Landscapes: Ideal for photos with a clear horizon or linear elements.
Cons:
- Directional Limitation: Limited to linear blurs, not suitable for all images.
- Manual Fine-Tuning: Requires adjustments to get the desired effect.
- Less Control: Less control over irregular shapes and complex backgrounds.
Which method is best to blur the background in Lightroom
Each method for blurring backgrounds in Lightroom has its own set of benefits and drawbacks. AI-based methods like Lens Blur and AI Mask offer quick and efficient solutions but may lack the fine control that manual methods provide. Traditional methods such as the Brush Tool, Radial Gradient, and Linear Gradient offer more precision but require more time and effort.
Choosing the right method depends on your specific needs, the complexity of the photo, and your proficiency with Lightroom tools.
Common Mistakes and How to Avoid Them
Blurring the background in Lightroom can greatly enhance your photos, but it’s important to avoid common mistakes to achieve the best results. Here are some tips on how to avoid them:
Over blurring and Unnatural Effects
Mistake:
- Applying too much blur can make the image look artificial and distract from the overall composition.
How to Avoid:
- Moderation is Key: Use the blur sliders with caution. Begin by setting a blur level and slowly raise it until you reach a natural look.
- Check Your Work: Regularly zoom out and view the entire image to ensure the blur looks natural. Overly blurred backgrounds can make the subject appear as if it’s pasted onto the scene.
- Blend Smoothly: Ensure smooth transitions between blurred and sharp areas. Use feathering tools to soften edges and blend the effect seamlessly.
Maintaining Subject Sharpness
Mistake:
- Accidentally blurring the subject along with the background can diminish the focus and impact of the image.
How to Avoid:
- Careful Masking: When using tools like the Brush, Radial Gradient, or AI Mask, pay close attention to the edges of your subject. Zoom in to refine the mask and ensure the subject remains sharp.
- Use the Erase Tool: If you accidentally blur part of the subject, use the Erase tool to remove the blur from those areas.
- AI Assistance: Utilize AI masking features to automatically detect and protect the subject, reducing the risk of blurring it unintentionally.
Keeping a Natural Look
Mistake:
- Creating an unrealistic blur effect that doesn’t match the natural depth of field can make the image look unconvincing.
How to Avoid:
- Match Natural Depth of Field: Pay attention to how depth of field naturally appears in photos. Typically, objects closer to the subject are less blurred than those further away. Adjust the blur intensity accordingly.
- Feathering and Transition: Use feathering tools to create gradual transitions between blurred and sharp areas. This helps in maintaining a natural depth effect.
- Context Consideration: Ensure that the level of blur matches the context of the photo. For instance, a portrait with a completely blurred background may look unnatural if taken in a busy environment.
By being mindful of these common mistakes and following these tips, you can create beautifully blurred backgrounds that enhance your photos without compromising their natural appeal or subject focus.
Enhancing the Blurred Background
Once you’ve successfully blurred the background in your photos using Lightroom, there are several ways to further enhance the effect and make your images stand out even more. Here are some techniques to consider:
Adding Color Adjustments
Enhancing Colors:
- Saturation and Vibrance: After blurring the background, adjust the saturation and vibrance to make the colors pop. Be careful not to overdo it, you want to enhance the background without overshadowing the subject.
- Color Grading: Use the color grading tools in Lightroom to add subtle color tones to the shadows, mid tones, and highlights of the blurred background. This can create a cohesive and artistic look.
Matching Tones:
- White Balance: Ensure the background’s white balance matches that of the subject to maintain a natural look. Adjust the temperature and tint sliders to achieve this.
- Selective Color Adjustments: Use the HSL (Hue, Saturation, Luminance) panel to make selective color adjustments. For instance, you can desaturate certain colors in the background to draw more attention to the subject.
Using Presets to Enhance the Effect
Preset Application:
- Background Specific Presets: Lightroom offers many presets specifically designed to enhance backgrounds. These presets can adjust colors, brightness, and contrast in a single click, giving the blurred background a polished look.
- Custom Presets: Create and save your own presets after you find a combination of adjustments that work well. This saves time and ensures consistency across multiple photos.
Blending Presets:
- Layering Presets: Sometimes, applying one preset over another can create unique effects. Experiment with layering different presets to achieve the desired look.
- Fine-Tuning Presets: After applying a preset, don’t forget to fine-tune the settings. Each photo is different, and small adjustments might be necessary to perfect the look.
Additional Tips for Creative Results
Enhance Depth:
- Foreground Elements: Add some blur to foreground elements to create a sense of depth and direct the viewer’s focus to the subject. Use the masking tools to selectively blur parts of the foreground.
- Vignetting: Apply a subtle vignette to darken the edges of the photo. this can further emphasize the subject and add a professional touch to your images.
Texture and Clarity Adjustments:
- Reducing Clarity: Lower the clarity of the background slightly to enhance the blur effect. This can make the subject stand out more clearly.
- Adding Texture: For creative effects, add some texture to the background to create an interesting visual element. This can be done selectively using the masking tools.
Creative Lighting:
- Artificial Light Effects: Use Lightroom’s local adjustment tools to simulate light effects, such as adding a soft spotlight on the subject or enhancing natural light in the background.
- Bokeh Effects: If your photo has light sources in the background, emphasize the bokeh effect to add a dreamy, artistic touch. Adjust the highlights and clarity to enhance this effect.
By applying these enhancements, you can take your blurred background photos to the next level, adding depth, color, and artistic flair to create truly stunning images.
Conclusion
Blurring the background in Lightroom is a powerful technique that can enhance your photos by making your subjects stand out by minimizing distractions. I have covered various methods, from the latest AI methods to traditional manual techniques, for both mobile and desktop versions of Lightroom. But the key is to set a balance and keep the effect natural.
You may experiment with different tools, presets, and adjustments in Lightroom. The more you practice, the less time taking it is to create beautiful natural looking images.
FAQs
1. How long does it take to blur a background in Lightroom?
- It can take a few minutes with AI tools, but manual methods might take longer due to detailed adjustments.
2. Can you blur the background in Lightroom mobile?
- Yes, both Android and iOS versions have tools to blur the background in lightroom app.
3. What’s the difference between using Lightroom and Photoshop for background blur?
- Lightroom is quicker for simple adjustments, while Photoshop offers more advanced, precise editing capabilities.
4. Do I need a specific type of lens to make background blur in Lightroom?
- Answer: No, you can add blur effects in Lightroom regardless of the lens used during shooting.
5. Can I use background blur presets on multiple images in Lightroom?
- Answer: Yes, you can create and apply presets to multiple images for consistent blur effects.


