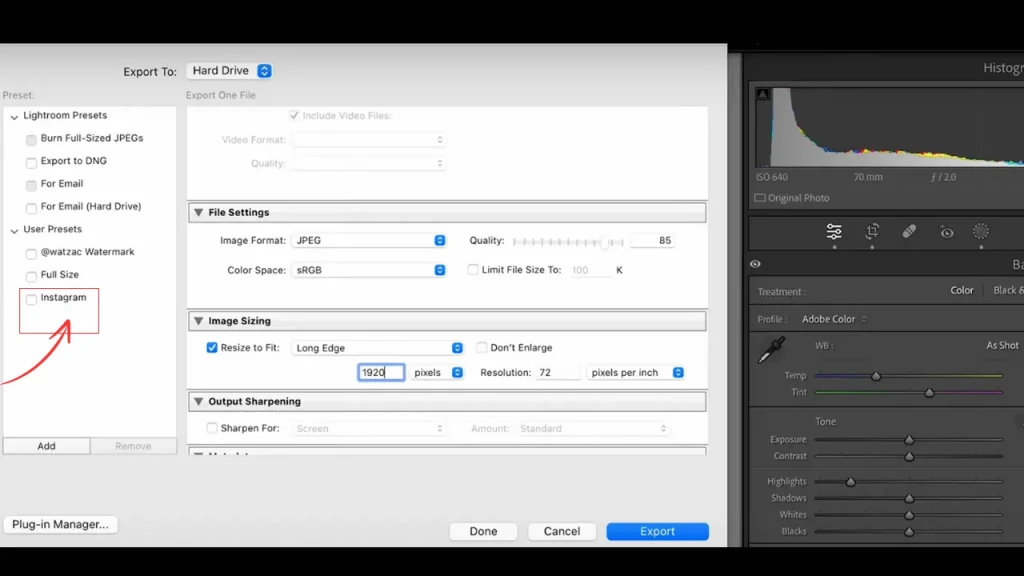
Use these best Lightroom export settings for Instagram to ensure your photos look their best. Learn how to optimize image quality, size, and color space for perfect Instagram posts.
| Setting | Recommendation |
| Image Format | JPEG |
| Color Space | sRGB |
| Quality | 76-100% |
| Image Crop | 4:5 for portrait, 1:1 for square, 1.91:1 for landscape |
| Dimensions | 1080 or 2160 pixels on the long side |
| Resolution | 72 pixels per inch (PPI) |
| Output Sharpening | Screen, Amount: High |
| Metadata | Copyright Only |
| File Naming | Original |
| Include Watermark | Unchecked |

Lightroom Export Settings for Instagram Detail

Image Format
Use JPEG for photos. It keeps the picture looking good and doesn’t make the file too big.
Color Space
Use sRGB to make sure the colors in your picture look the same on different devices like phones, tablets, and computers.
Quality
Set the quality between 76-100%. This keeps your photo looking nice without making the file too large.
Image Crop
Crop your photos to fit Instagram:
- 4:5 for tall photos (portrait)
- 1:1 for square photos
- 1.91:1 for wide photos (landscape)
Dimensions
Set the longest side of your photo to 1080 pixels. This helps avoid Instagram making your photo look worse by resizing it.
Resolution
Set the resolution to 72 PPI (pixels per inch). Higher numbers don’t make your picture look better on screens.
Output Sharpening
Choose Sharpen for Screen with the High setting. This keeps your picture looking sharp even after Instagram compresses it.
Metadata
Include only copyright information. This keeps extra details out of your file and makes it look clean.
File Naming
Use the original file name. This keeps things simple and organized.
Include Watermark
Uncheck this option. This keeps your pictures clean and free of extra marks.
Using Presets to Save the Lightroom Export Settings
Lightroom Presets
Lightroom presets are settings that you can apply to your photos with just one click. Think of them as a recipe for your pictures that you can use over and over again to make them look great.
You can download Lightroom export settings presets for Instagram, Facebook, print, website and high resolution presets along with 50+ Lightroom presets from here.
How to Create your Own Preset for Lightroom Export Settings for Instagram
- Create a Preset:
- Open Lightroom and edit a photo with the export settings you want for Instagram (like the ones we talked about earlier).
- Once you’re happy with the settings, go to the Develop module.
- On the left side, find the Presets panel and click the + button at the top to create a new preset.
- Name your preset (e.g., “Instagram Export”) and choose which settings to include (make sure to include the export settings).
- Click Create.
- Use a Preset:
- Select the photo(s) you want to export for Instagram.
- Go to the File menu and choose Export.
- In the export dialog, find the Preset drop-down menu.
- Select your newly created “Instagram Export” preset.
- Click Export.
Using presets makes it easy to apply the same Lightroom export settings for Instagram to all your photos whenever you upload.
Conclusion
Whether you’re posting a single photo or multiple images, these tips will help you maintain high-quality images on Instagram. Experiment with these lightroom export settings for Instagram and find what works best for your style.
I have also used these settings for a long time and found these lightroom settings very useful. You can also use these settings and enjoy presenting your work in the best possible way. For added functionality and extra features, consider using this Lightroom mobile version to further optimize your photos.
FAQs
How to Export Multiple Photos in Lightroom?
To export multiple photos, select the photos you want to export by holding down the Ctrl key (Windows) or Command key (Mac) and clicking on each photo. Then, go to File > Export and choose your settings. Click Export to save all the selected photos at once.
How to Save a Preset in Lightroom?
First, edit a photo with the settings you want to save. Then, in the Develop module, click the + button in the Presets panel on the left. Name your preset and choose the settings you want to include. Click Create to save the preset for future use.
How to Change Lightroom Export Settings?
To change export settings, select the photo(s) you want to export and go to File > Export. In the export dialog, adjust the settings such as file format, image size, and quality. Once you’re happy with the settings, click Export to save the photo(s) with the new settings.
Why Should I Use sRGB Color Space for Instagram?
Using sRGB ensures that the colors in your photo look consistent and accurate across different devices. Instagram automatically converts images to sRGB, so exporting in this color space prevents any unexpected color changes when your photo is uploaded.
How Do I Create a Lightroom Export Preset for Instagram?
Edit a photo with your desired Instagram export settings. In the Develop module, click the + button in the Presets panel. Name your preset, choose the settings to include, and click Create. Now, you can easily apply these settings to future exports by selecting the preset in the export dialog.


